
I have been sailing for 50 years as far north as Maine, as far east as Bermuda, as far south as Venezuela. I spent five years living aboard, exploring the Bahamas, Dominican Republic, Puerto Rico, the Leeward, and the Windward Islands before ending in Venezuela. Our home base at that time was Westport, Connecticut; but upon our return, the furthest north we got was Marco Island, Florida. This is now our new home base. From there we continued sailing further through the Bahamas and the Florida West coast. After 20 years, my life changed to the point where I felt it necessary to sell my sailboat, Grendel, a Passport 40. I also sold my home and moved inland expecting my cruising days were over. However, I didn’t realize I would miss the water and cruising life as much as I did. So, I decided to once again return; however, this time at an advanced mature age, I went to the Dark Side, or shall I say the Grey side. I decided to buy a trawler.
This is where the problem began. I bought into the problem of speed: after all, I have spent 50 years happy to be able to go at six knots, exceedingly happy at seven knots, even ecstatic at eight knots, and scared sh****ss at 10 knots. If I could go at a reliable seven knots regardless of wind direction, I would be perfectly happy. The next issue is that of the economy. I have seen too many sailors sitting on their motor boats at the marina because of the cost of fuel to make a passage. Basically, what I wanted was the economy of a sailboat under power with a respectable range on a tank of fuel. In addition, it was important to have a boat that was seaworthy, that could be taken offshore and that would behave in a respectable manner in a seaway. The water and fuel capacity must be consistent with the need for longer-term travel independent of marinas. The same can be said for sufficient interior storage space for supplies. The accommodations had to be comfortable for two people with an occasional two-person sleepover.
Upon studying both new and used boats I quickly found out that the boat I visualized didn’t exist. The trawlers available appear to have one or more high horsepower engines, 300+ hp, with the necessary fuel consumption that they require. The tanks, while large, were needed to service this high usage of fuel. Typically, the water capacity was more consistent with a boat which would be spending a lot of time going from marina to marina which would be the case due to the fuel consumption. But they were big and roomy; and most, I could not imagine being very comfortable in a mature seaway. The cost of the newer boats was excessive, more than I wanted to spend. Only the cost of the 20+year-old boats came close to what I would spend, but they still did not meet my needs. It was only then that I saw an ad on a news website advertising a long-range cruiser. It was a different-looking boat resembling a North Sea Trawler with a fore cabin for sleeping and a center cockpit followed by a Pilothouse with a helm, dinette, and galley. It was 36 ft with a range of 2000 miles at 6.7 knots on a tank of fuel. Its maximum speed was 9 knots and its water capacity was 150 gal. Plus, it was incredibly well-priced. This required more attention. It was designed by an incredibly talented young engineer from the Netherlands, Ritzo Muntinga, now native to San Diego. He, with the assistance of some very talented local boat builders, came up with the design. The hull is long and narrow, 36 ft by 8.5 ft. The 8.5 ft makes it easily trailerable and naturally inexpensive to ship. I felt the boat should be 10 ft but the argument of economy is hard to counter. While it is 8.5 ft, the sides of the cabin are brought right out to the edge of the gunnels with no walk-around, making the interior space the equivalent of a boat with a 10 ft beam with a 1 ft walk-around on either side. The original idea was to manufacture the boat in San Diego, but that idea didn’t last long because of the prohibitive cost. China was a natural place to build it for reasons of lower cost, complemented by the fact that the shipping cost was moderate.* The advantage of the narrow beam and its length is that the boat occupies the space of a standard shipping container which greatly reduces the cost of shipping. The hull has a keel with a protected rudder and draws 2’9”. The air draft is 16 ft. The keel has 2000 lbs of ballast; and considering the engine, fuel, and water, there is 6600 lbs below the water line. This makes for a comfortable ride. I chose to guarantee this by adding an optional Seakeeper gyro stabilizer.
*Seapiper has now been repatriated back to the USA and is manufactured by Seattle Yachts, manufacturer of Tartan Yachts.
The Seapiper’s hull was fashioned after the Sea Bright Skiff made popular in the latter half of the 19th and the first half of the 20th century. Ritzo Muntinga with the use of modern computer modeling and modern hull advances optimized the most salient features of the Sea Bright skiff making, in effect, the 21st-century version of the very popular Sea Bright hull.
A tribute to the success of the Sea Bright skiff, in its day, is that it was the boat of choice for the rumrunners of yesteryear!
Naval architect Dave Gerr gives us some insight into why the design was so popular in his book “The Nature of Boats”…… “ the hulls were light and strong and their bottoms dead flat athwartships for as much as a third of their beam… this sets it apart from other boats, is its hollow box garboard or skeg……..Another plus of these box skegs is that they create plenty of additional volume down low on the centerline of the hull aft. Since the bottom of the engine can nestle down into the top of the skeg box, Sea Bright skiffs are one of the few relatively light boats that can fit engines low enough to have virtually no shaft angle (that is , their propeller is parallel to the waterline). Low shaft angles mean improved thrust and higher efficiency. At the same time, getting the engine low in the hull improves stability and reduces rolling, and what’s more, it frees up room above the engine for storage, workspace, or accommodations. Keeping weights low is one of the important contributors to making a good sea boat, and I wouldn’t be surprised if this alone accounts for much of the Sea Bright skiff’s ableness………Of course, the box garboard or skeg also acts – who would of guessed it? – like a skeg. In other words, it provides good directional stability.”
Well, the Coast Guard had to finally buy into it, to keep up with their nemesis, and they started building Sea Bright skiffs to catch the bad guys!!
My intent is not to describe the boat in detail here but rather to direct you to http://seapiper.com where you can get a complete description of the boat. What I would like to do is share with you what we did to make the Seapiper a comfortable safe cruiser.
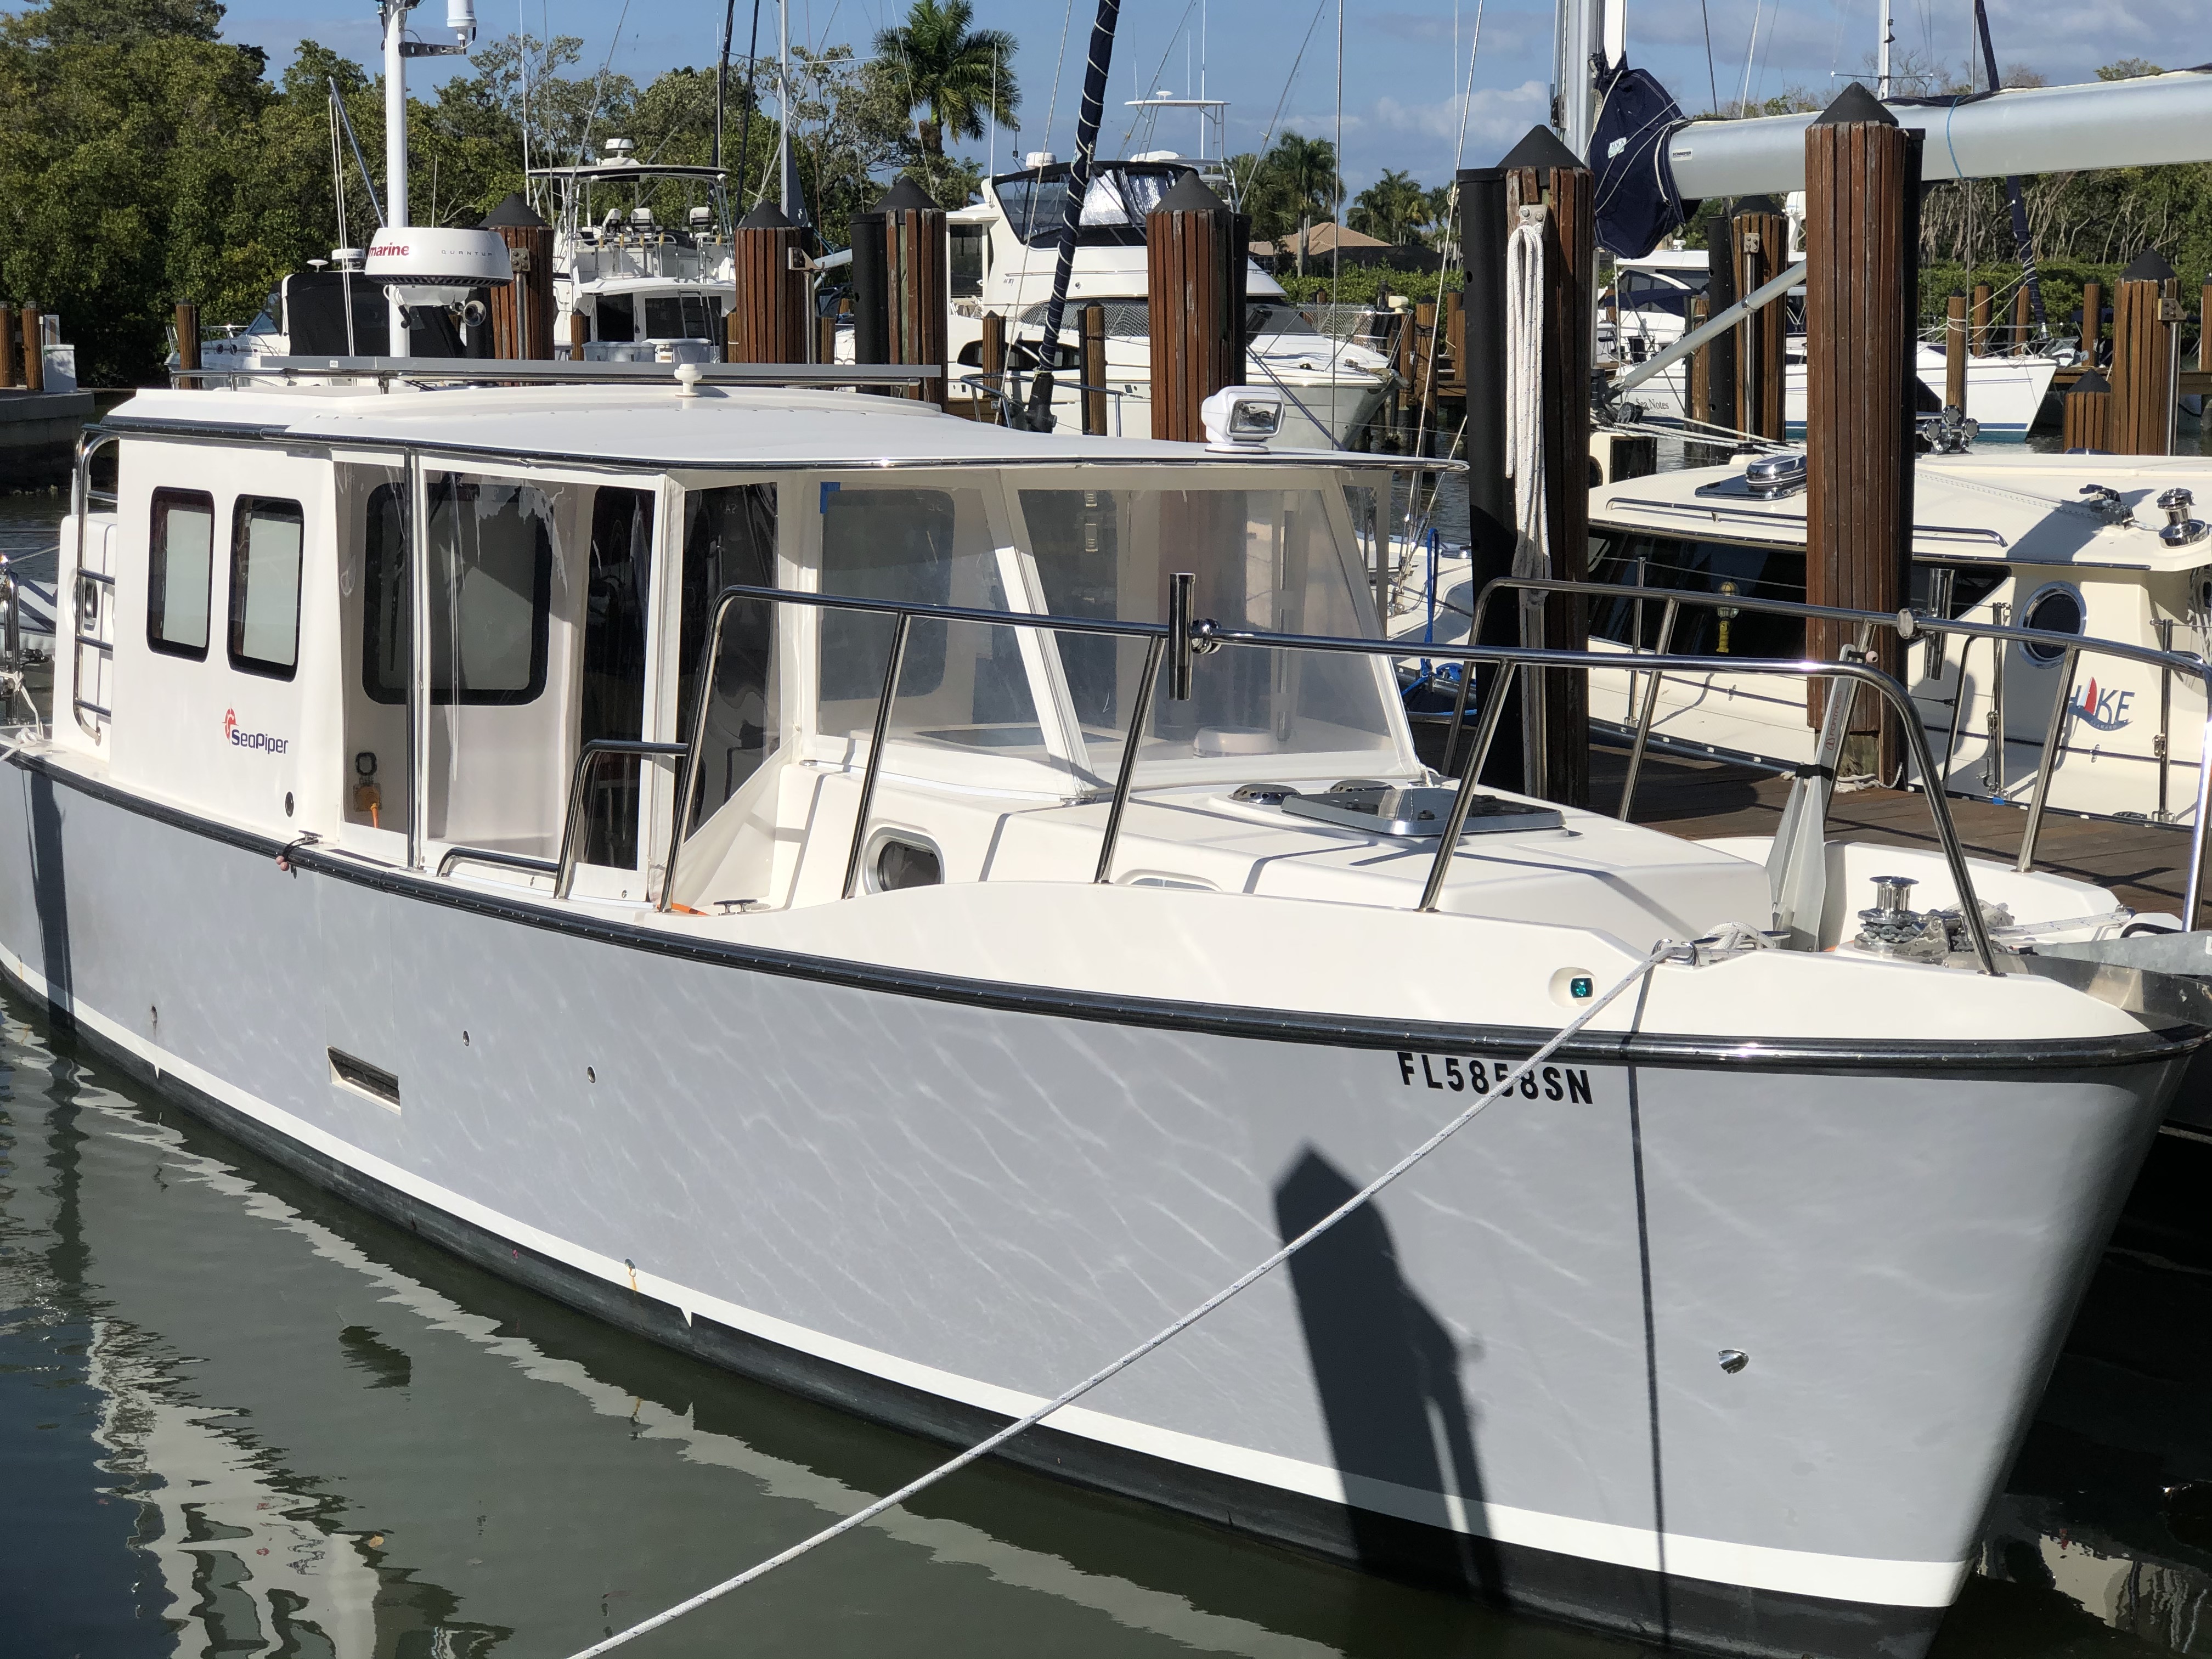
One of the first things I did was to deal with what I consider one of the shortcomings of the design of the boat. Saying it’s a shortcoming is a bit severe since the cockpit is one of the liveable features of the design. As with everything, there is always a downside: the open cockpit lacks protection when one has to visit the fore cabin for whatever reason, mainly going to the head. Also when one opens the sliding door leading from the pilot house, particularly when underway, there is a rush of air filled with spray that meets you as soon as the door is opened. This is not a very enjoyable experience. Coupling this with the periods of unrelenting sun, I think you get my point. This was solved with an appropriately designed and constructed dodger and bimini combination extending from the fore cabin to the forward edge of the pilot house. There are clear drop acrylic curtains that can be pinned up when not in use, to protect them from the sun. Additionally, there are sliding doors at each cockpit door plus access to the fore deck on either side of the fore cabin.

We bought an 8.5 ft AB hard bottom inflatable and a 9.8 hp Tohatsu motor which I think is the largest practical for the boat. To store it, I installed Garhauer Marine davits on the stern. I mounted a winch on one of the vertical braces; and through a series of blocks, I brought both hauling leads over to the winch. There, I use an electric drill inserted in the winch to haul up the dinghy and attached motor.


The anchor well of the Seapiper is quite voluminous. I divided it into two sections: the aft section contains 200 ft of 5/16″ chain and the forward section has 200 ft of 5/8″ braided rode. The wash-down bib in the enclosed anchor compartment had been fresh water; I changed it to seawater. I also mounted a fitting and hose over the bow roller to wash the chain and anchor off as it was being raised. The anchor I chose was a Rocna 25 (55 lb) which is about the largest that could be put up there.

As I had mentioned previously, there is a significant amount of weight below the waterline in the Seapiper. My concern was, that since the hull is relatively narrow, there would be a natural tendency to roll even though all design attempts were made to the contrary. At a Miami Boat Show, I experienced the performance of a boat containing a Seakeeper Gyro Stabilizer. It was a remarkable experience; it truly stopped rolling almost instantly. I decided this is the type of insurance that was needed on our new Seapiper. The Seakeeper engineers claim that their Seakeeper 2 would reduce the roll of the Seapiper by 85-90%, and they were right. However, like all things, there is a price to pay; and that is energy consumption. The device works by spinning a heavy wheel in a frictionless environment. It takes 65A DC to do this and it takes 45 minutes for it to reach its necessary speed of 9000rpm (as a side note when you shut it off it takes 16 hr to stop spinning). Once it’s up to its rated rpm, the current reduces to 20A DC. This device and the dodger/bimini are probably the most important additions I made to the boat.

The KIWI has a 3000 Samlex inverter charger which is capable of running the two AC air conditioner compressors, one being 10,000 BTU and the other, 6000 BTU. This, plus the Seakeeper, the electronics, the autopilot, refrigeration, and the rest of the electronics plus miscellaneous electrical equipment adds up to a significant electrical load. To counter this, attention must be given to the batteries and their charging means. I chose to add a sufficient number of high-quality batteries, a high-output alternator with an equally high-output regulator plus a solar panel charging system. I added six AGM Lifeline batteries, GPL-31XT, for a total of 750AH.

I chose to replace the standard 125 A alternator/regulator with a 360A alternator made by American Power Systems. This alternator has a high output which is more than I will need but it is better to run an alternator below rating for reliability reasons. This meant not only replacing the alternator and its mounting but also the pulleys on the engine. I also added a state-of-the-art external regulator made by Wakespeed a WS500.


The solar system I chose was meant to take care of the electrical needs when at anchor: lighting, refrigeration, and other miscellaneous electrical demands. Toward that end, I chose an LG 400 W panel which I mounted on top of the pilot house on stainless steel rails extending the length of the pilot house. The controller I chose was an MPPT Smart Solar Charge Controller 100/30 made by Victron Energy.


Electronics are particularly important. My choice was Raymarine,. The operation of the Garmin that I had before was not intuitive in operation. I find Raymarine to be better in that regard. Of Raymarine, I have an Axiom 9 MFD, a remote SD card reader, EV- 200 Autopilot, Quantum Q24 Radar, Wind Speed/Wind Direction System, P319 transducer for depth and boat speed, an i70 display, SR200 XM Weather Receiver and a Smart autopilot remote. The VHF is a Standard Horizon GX1600. A remote for the windlass and the bow thruster is from Vetus. I added a much-needed rear and engine video system by Fookoo and, last but not least, a Richie Voyager B81 Compass.


Communication is an important part of cruising. For coastal cruising, the VHF radio has always been a vital link for marine communications. However, in the present age, cell phone communication on the water is very popular, as is WiFi. You are no longer required to be in or close to a marina to get WiFi. You can get it on your cell phone: and using your cell phone as a hot spot, you can receive WiFi anywhere you can receive cell phone signals. Therefore, it behooves us to do all we can to extend the range of reception of our cell phone signal; and if you like Netflix or other streaming services, you want to expand your data usage and rate. Toward this end, I added a Poynting Omni 400, a high-performance LTE antenna to my mast, connected to a Surecall Fusion 2GO-3 cell phone signal booster. This gives me a significantly greater cell phone range; and when using my cell phone as a hotspot, I have WiFi throughout the boat. We can watch all our streaming channels. Lately, I have been using a Verizon Jetpack MIFI 8800L as my hot spot, freeing up my phone. Also, I added a conventional TV antenna and amplifier for local stations. The 24″ TV is mounted so it swings up out of the way.


The galley is very important as is a freezer. The standard refrigerator is fine as a refrigerator but its freezer is totally inadequate. To solve this, we requested a freezer option, which is an Isotherm Bi41 which has worked out well.

To the propane stove, we added an electric combination dry fryer, broiler, oven and toaster.

The following are a number of additions that we found to be most useful.
Expansion of the comfortable seating in the cockpit. This increases seating in the cockpit when the cockpit doors are not being used, such as when underway. It makes a nice seat with a backrest while facing forward. It consists of a tubular frame mounted in the top of the cockpit seat. This frame slides back under the cockpit seat when not in use. When in use, you pull it out, attach a board to the top surface (I use a plastic board with clips to attach it to the tubes), and then add the cushion.


In the fore cabin, we added textilene panels with twist-lock fasteners in front of the shelves on each side of the bunk to make for easily accessible storage.


While we are on the subject, V-berths suck. They are difficult to get in and out of without disturbing your mate and, it gets worse the older you get! In an attempt to ameliorate the situation, I added SS handles on each of the three walls above the bunk. This makes for an easier gymnastic getting in or out of the bunk!!

We added a ladder to the stern which had to be tilted in order to close the stern door. Also, not shown in the pictures, I added a rubber flapper to minimize water flooding the stern.


I made a fender holder out of thin wall PVC tubing; this gets the fenders out of the way and keeps them out of the sun.

The Beta engine uses the output from the alternator’s field signal to provide the pulses to the tachometer which is mounted on the engine control panel. This is fine, however when the battery is charged typically there will be no or little field voltage and therefore no tachometer readings. Other engines use a sensor mounted on the engine to count pulses from the engines flywheel. I found this problem rather annoying. I found a device made by Design Technologies in Indiana which senses the fuel pulses in an injector tubing with their piezoelectric sensor mechanically mounted to the injector tubing and electrically connected to their Piezoelectric Amplifier. That output signal drives the tachometer on the engine panel totally bypassing the problem. The first picture shows the sensor and the second shows the amplifier.


One thing I found lacking in the boat was a bookcase to hold cruising books, instruction manuals and various reading material. The problem was where to put it plus what to make it from. After much thought I decided to make two bookcases, since I couldn’t figure out where to mount only one of some reasonable size. I mounted one over the aft end of the navigation surface and the other over the aft end of the dinette. This gave us two linear feet of book shelves. Next the problem was what to use for their construction. I did not feel I could match the color and finish of the wooden bulkheads in the boat, so next to consider was plastics. Starboard came to mind but I was afraid the stark whiteness would not compliment the interior. I settled on acrylic since it seemed less invasive because of its transparency and would thus compliment the dominance of finished wooden interior.


When I am aboard operating the vessel or sleeping I want to know when a bilge pump runs and which one it is. To this end I added lights with self contained alarms which signal when a pump is running. KIWI has four bilge pumps, one in the forecabin, in the engine room, in the galley area and in the aft lazarette. Each light/alarm has a switch so I can shut the alarm if I am working on the pump.

It has not been easy to access the oil filter on the Beta engine. To improve its accessibility I added a remote filter kit to make it easier and neater to change the oil filter.

On long passages there inevitably develops an exhaust mustache at each of the exhaust outlets on the hull. To moderate that I found that a vinyl coupler that is used for vinyl spiral hose fits nicely in the exhaust outlet. The picture shown is the resulting mustache after 1500 miles.

One thing I have found objectionable is the shower accomodation in the head. While small, I found the sink and commode to work out OK, but with the shower there is just not enough room. To deal with not getting everything in the head wet when you shower I installed a shower curtain that encloses 360 degrees of the shower area; which is good but it is too small. To increase the shower stall volume, what I did was to adopt the technique which is now used in home tube showers, but I made it retractable. That is, you only use it when you take a shower. In the bottom of the shower curtain I added weights which keeps the shower curtain in the shower stall. At the top of the curtain I have a retractable frame which one could extend out into the exterior of the shower stall, this provides you more shoulder room in the shower. This is not unlike what is done these days in home bathtub showers.


After having recently taken a 5 month cruise in KIWI you tend to find things that you would like to improve. Other than the the showering accommodation, improved interior lighting required some improvement. When you use the boat for an extended period you find there are spaces you occupy at night that needs improved lighting. For us it was the forward section of the dinette table plus the area referred to as the navigation station. We added another of the same fixtures that were already use in the salon in both of these locations.


After a five month cruise from Naples through the Chesapeake, spending a significant amount of time at anchor, we realized that 400 watts of solar panel is marginal if one wants to stay off the grid or not want to start the engine. Also I learned again that being plugged into shore power here in Florida during lightning season is not a good idea. Here in Florida, particularly during the summer months, there is considerable amount of lightening . The lightening does not usually hit the boat but rather it hits the power grid with the resulting transients translated into the boat through the boat’s power cord. The result usually decimates the boat’s electrical/electronic systems. For these reasons we decided to add a second 400W solar panel with a second Victron MPPT 100/30 Controller giving us a total of 800W of solar energy. This will allow us to live off the grid and allow us to leave the boat unattended at it’s dock without the use of a line cord. We located the second panel on the top of the pilot house immediately behind the original one. When I installed the first panel I mounted two SS railings on either side of the pilot house roof to which I mounted the original solar panel. Since the railing was the length of the cabin top there was enough room to mount a second panel. The problem was that mounting the panel in that location covers the center opening hatch of the pilot hatch. In the two years we have been cruising KIWI we seldom opened that hatch. It is located over the dinette and with the height of the overhead, it was always a chore to open it. Luckily there is an abundant amount of air movement in the cabin as well as an abundant amount of light, so the opening overhead hatch is not missed.

We discovered Induction Cooking. I have never been a fan of propane on a boat. We bought a two burner cooktop to experiment with. I found that two cups of water boils 3-4 times faster with induction heating relative to the heating the same volume on a gas stove. Since the cooking time is shortened considerably, the energy consumption should be moderate. Plus reading the various cruising and RV forums they all seem to rave about their induction cooktops. The additional advantage of getting rid of propane on KIWI is that it frees up a locker to provide another storage area. The propane locker on KIWI is really not useable for anything but propane because it is a very wet locker. The locker is vented to the outside by a through hull on the stern. However this through hull lets water in from time to time, making for a very wet locker. Eliminating the propane allows me to fiberglass off the water inlet to the locker. In the end we have a nice and dry locker. The cook top inserts in a cutout which is a bit larger than the cut out of the original propane stove. The 120ACV I connected to the rear of the AC outlet next to the faucets. The power consumption is 1800W which is the rating of each of the AC plugs in the boat.

One of my concerns is getting air in the fuel line due, for one reason, having a low fuel in the tank and sucking up some air. It would happen at the most inconvenient time making it difficult to go below and remedy the problem. To help mediate this possible problem I added a electrically driven prime pump to the diesel line entering the engine. The pump can be activated on the instrument panel.

We have always depended on SSB for weather information in areas where no other means of communication was available. Recently for coastal cruising the internet was the go to place for weather. This has been enhanced by the increased availability of cell towers. Add to this, high gain antennas and cell signal amplifiers and you have a seemingly reliable source for weather information for coastal cruising. However it is not perfect, some remote areas like the Everglades, some places in the Florida Keys and the Bahamas plus a few spots on the intercoastal, reception is weak or nonexistent. To counter this short fall I decided to install Starlink, Elon Musk’s satellite system with presently 2000 satellites in orbit with a total of 20,000 planned for the future. I am using their R/V version. Shown in the photos is how I mounted the antenna on top of my tubular storage rack for the boat’s fenders. The stock antenna is a rectangular flat dish on a tripod. The stock dish is driven by a servo system which aligns the dish to the satellites to optimize the signal strength. The antenna itself is a phased array system which in itself optimizes the received signal. This is acceptable, but not as good as when it is enhanced with the servo system. I chose to disable the servo system and depend solely on the inherent properties of the dish. I surrounded the base of the antenna with a plastic frame. The third picture is the router mounted in the cabin. So far it works quite well.


The Starlink appears to work quite well, however since we spend a significant amount of time at anchor, power consumption is a concern. The Starlink requires 120V AC and therefore must be powered from our inverter. Considering the power required by the antenna and its related electronics plus the inefficiency of converting 12V DC to 120V AC, the draw from the battery is somewhere between 5 to 6 AMPS, which is appreciable. To reduce this current I decided to convert the power input of the Starlink to 12V DC and eliminate the Starlink router which contains the power supply for the antenna and its electronics all contained in the dish. I purchased a Starlink Power Supply called StarPower from an Austrialian Company called SpaceTek. This device consists of a DC to DC converter to convert 12V DC to 48V DC, which is needed by the Starlink dish, plus it has PoE device that is used to mix the 48V DC with the data wires of the Ethernet cable supplying the Starlink dish. I used the DataHub from PredictWind, which I use for my PredictWind program and also to supply GPS signals to my ipad, as the router to supply internet to the boat. The current drain now is 2 to 3 AMPS.

The bow thruster on KIWI works quite well however controlling the stern is yet another matter. I have been docking sailboats for many years without any thrusters. The technique is to use the prop walk in combination with the rudder and bursts of throttle. Well, this doesn’t work very well with this boat. This is probably the reason Seapiper is offering a stern thruster on their new boats. Faced with this problem I decided to search for an add-on stern thruster that can accommodate the physical constraints of the stern section of the hull. I found one made in Canada manufactured by a company named Sideshift which seems to have a good reputation. To date, it appears to work quite well.


Did I mention that I hate V-berths? Yes, I hate V-berths! However, as is the case with boats there are always compromises. On the Seapiper there is absolutely no room for a center-line bed with walk-around on three sides! Hence, the V-berth! The berth has an insert in its aft section that allows for a rather wide berth where one’s head and shoulders would be. This is nice but it blocks access to the two drawers under the berth. Also, it makes entering and exiting the berth more difficult. Therefore we do not use the insert. Now when you use a king-size sheet over the mattress, assuming you do not have a custom-made sheet, the sheet stretches across the opening where the insert would have been. Now when exiting the berth it is highly possible that one would get their big toe stuck in the sheet and fall forward implanting one’s nose into the cabin’s ladder! The next problem is putting the sheet on the bed. One picks up the edge of the cushion to slip the sheet underneath. Well, that is not that easy since you are kneeling on the cushion you are trying to pick up. (Sorry this is not a super technical issue, however …if momma is not happy, no one is happy!) As the result of an article in The Trawler Forum I made the following addition to help correct the problems. We added a 3″ thick foam mattress topper that is cut along the centerline of the mattress. This is shown in the first photo. The next photo shows the foam encased in a mesh fabric to protect the foam from ripping. The advantage of this is that the two berths are separated and a Twin sheet can be used on each and the sheet can be dressed without kneeling on the berth one is making up. The third photo shows the berth each with their Twin sheets. Notice the center is open for easy egress and the drawers are accessible.


Awesome boat and what you’ve done with it is remarkable. You are my new hero!
My long term goal is to migrate to trawler life. I currently own a Tiara 4000 Express with a hard top. For the past 10 years we’ve cruised her on the Erie Canal system and the Great Lakes.
Regards, Tony Oudshoorn cpttonyo@gmail.com
LikeLike
Tony – thank you!!!! You have a nice boat now!!! Life on a trawler would be a lot slower, but less expensive!!
LikeLike
Thank you for the writeup on your SeaPiper and your custom touches! In particular, the cockpit seating extension is brilliant and Ritzo should adopt this as a factory option. Speaking of Ritzo, it’s a huge plus to be able to speak to him directly and he is super responsive to questions. That being said, he’s still in the business to sell boats. Would you consider posting a blog entry with your experiences with SeaPiper so far? Maybe a combination boat review and travelogue? There’s not a lot out there on the web about these intriguing little boats and I’m sure I wouldn’t be the only one who would be really interested in your thoughts and experiences so far.
LikeLike
Brad – thank you for your kind comments. I am an engineer and an accomplished cruiser. Ritzo who you have talked to is a very bright engineer with the ability to listen and recognize what has to be changed. I have Hull 5 and have been working with Ritzo for one and one half years to correct the short comings in the design and its implementation. Writing what my experiences were would be meaningless since most if no all of my experiences have been a corrected in the present boats.
LikeLike
I LOVE the enclosure design and how it improves the trawler. Would you be willing to share your design?
LikeLike
Thank you, Jeff. I certainly would be willing to share the design and help you out in the process.
LikeLike
Thanks so much. We are in the process of purchasing a used boat and I’d be very interested in your experience i with sea keeping. The boat we are looking at does not have a sea keeper. We are in New England and will be doing coastal cruising. We occasionally get caught in 3-5 foot seas in our area.
Best,
Jeff
LikeLike
Jeff – good luck with your new purchase! I assume it’s a Seapiper and I assume it is hull#10? I am also from New England(Connecticut) having sailed in Long Island Sound through Massachusetts and its islands and on through Maine, for more than 24years. I am relatively familiar with your waters. I don’t think you have a problem. The Seapipper is quite stable even without a Seakeeper. It has 6700lb below the waterline, 7100lb with a Seakeeper. It’s a shoal draft so with a quartering following sea of a particular frequency it will roll, however, you will learn how to steer to avoid those situations. I highly recommend a Seakeeper to help moderate those circumstances but even with that you have to be mindful of a sizable quartering sea of a sympathetic frequency with the hull. This is not unique with only this boat. However, a Seakeeper will help to keep momma happy; as they say “momma ain’t happy ain’t nobody happy”! I believe the installation would be quite painless since the boat I think has been built to accommodate it.
LikeLike
Thank you for taking the time to write a very interesting and informative article.
Do you have a blog/youtube channel, I would be interested to follow your cruising adventures in Kiwi.
LikeLike
Robert – sorry for the delayed response, having just seen your comment. Our travels are logged on https://forecast.predictwind.com/tracking/display/MV_Kiwi/. This past year was to be the Bahamas but family responsibilities got in the way.
LikeLike
Really appreciate you putting together your boat updates – nice job!
LikeLike
Jason – Thank you very much!!
Herman
LikeLike